• About
    • Music
    • Portraits
    • Surf / Skate
    • Travel
    • The Viewfinder Project
    • Brand
    • Events
  • Blog
  • Contact
Menu

James Saulsky

  • About
  • Photography
    • Music
    • Portraits
    • Surf / Skate
    • Travel
    • The Viewfinder Project
    • Brand
    • Events
  • Blog
  • Contact
×

Photo Tips - Mobile Photography 101

James Saulsky February 23, 2016

For more photo tips sent to your inbox once a week, just click here. 


On a recent trip, I was halfway to my destination when I realized I had left my DSLR battery at home...5 hours away. I knew I was going to take a lot of photos that weekend and was crushed. At first. After a few minutes spent lamenting the Nikon shaped paperweight in my bag, I took out my iPhone and began documenting the next 3 days. 

Here are some of the photos. All taken with an iPhone and edited in VSCO Cam. I'll get into my editing process later on in this series but I was pretty happy with the results.

View fullsize unnamed (12).jpg
View fullsize unnamed (13).jpg
View fullsize unnamed (10).jpg
View fullsize unnamed (11).jpg

What started out as a hindrance turned into a fantastic creative opportunity. Because I was less worried about setting depth of field, changing lenses, and all the other options a DSLR gives you, I was able to focus more on the core aspects of a good photo: composition, lighting, and subject.

If you want to see more photos from the trip, simply click here.

Whether you're an experienced photographer with top of the line camera bodies, glass, and editing software, or just want to capture clean shots with your mobile phone, the tips in this mobile photography series will help you improve your photography across the board. 

In this first newsletter, we're going to start with 3 simple steps you can use today to take better photos with your phone. 


PART I - Set Your Focus and Exposure

Most of the issues with mobile photography come from your phone trying to automatically guess the settings.  

How many times have you opened your camera to take a photo of your friend next to a bright window only to have their face cast completely in shadow or had a photo in a dark room come out grainy looking or blurry? Probably too many.

Fortunately, this has nothing to do with you and is easily solved by setting your own focus and exposure.

To set focus, just tap the screen over your subject to lock the focus point. A yellow square will appear to indicate the area in focus. When you do this, your phone will also automatically set the exposure, which leads to those blown out or underexposed images. To set the exposure yourself, hold down your finger over until the yellow sun icon appears and drag over the screen. Drag up for a brighter image and down for a darker image.

Hold over the point you want to focus on and drag to adjust exposure. Drag down to darken and up to lighten the photo. 

Hold over the point you want to focus on and drag to adjust exposure. Drag down to darken and up to lighten the photo. 

n this photo, I tapped on the leaf to set the focus and dragged the exposure down to prevent the building from being blown out.

Exposure Tips

In general, you can use these tips when setting you exposure:

Landscapes: Underexpose the image slightly or expose for the sky (drag down on the sun icon). It's easier to recover details from shadows than from overexposed highlights. 

Portraits: Expose for your subject (set focus point on their face and adjust exposure accordingly).


Landscapes

By exposing for the sky and underexposing the buildings, all the detail in the sunset comes through clearly while creating an eye-catching silhouette of the skyline. 
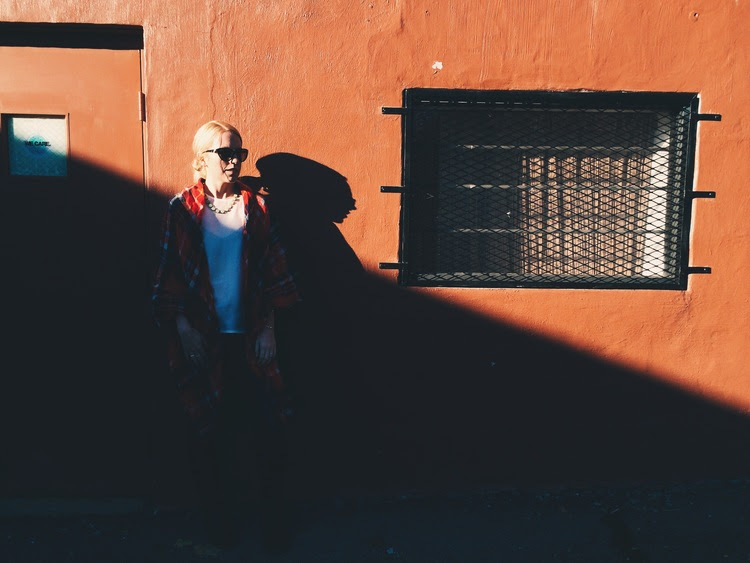
Portraits

unnamed (12).jpg

By setting the focus onto Alicia's face and exposing for her skin tone, the detail on her face was preserved. Without manually setting the exposure, her face would have been too bright and would have blended in with the bright wall behind her.


PART 2 - Using Additional Camera Settings

Flash

In general, your photos will look better if you turn off the flash on your camera and move to a brighter spot or use focus points and manual exposure to brighten up your photos.

Using the built-in flash will create a lot of unwanted contrast and cast the background into darkness. Try to only use the built in flash when there is no other natural light available.

For portraits, the easiest way to find good light indoors is to place your subject next to a window. 


HDR (High Dynamic Range)

The iPhone also comes with a built-in tool to help with high contrast photos, like sunsets, sunrises, and photos taken inside near bright windows. The HDR (or High Dynamic Range) setting combines three exposures (over, under, and correctly exposed) to pull more detail from the shadows, highlights, and mid-tones, of the photo. 


HRD is a helpful tool to balance exposure but you'll likely see better results by setting your exposure manually or combining HDR with manual exposure. 


PART 3 - Check Out Camera Apps + Lenses

Manual

For even more control over your phone's camera, you can download a third party app like Manual for $2.99. With Manual, you can precisely control the focus, ISO, and shutter speed of the camera. 


If you're more comfortable with changing all the settings yourself, apps like Manual can be useful for fine-tuning your photos. 

My favorite feature on the app is the ability to control shutter speed. It's great for capturing motion in low light (preventing blurry images) or for capturing action shots of pets, sporting events, and other fast paced subjects.

Olloclip

If you're willing to spend a little more money, you can pick up the 3 in 1 clip on lens from Olloclip for $49.99. The Olloclip 3 in 1 lens includes a super wide angle fisheye lens, a macro lens for close-up shots, and a wide angle lens. 

You can see more photos taken with the Olloclip lenses on their Instagram. 

Moment

For a bit more money, $99, you can pick up one of Moment's telephoto, wide angle, or macro lenses. They're a bit pricey, but the image quality is superb. You can check out a whole gallery of great photos taken with Moment lenses on their Instagram. 

What's Next?

Hopefully you enjoyed this post! If you want to have more photo tips sent to your inbox once a week, just click here to join the list. 

Once you're in, I'll send you posts covering things like nailing focus in low light, figuring out all those buttons on your DSLR, and editing photos in VSCO cam and Lightroom.

Until next time, here are some great iPhoneographers for some mobile photography inspiration. 


Kevin Russ

Dan Cole

Spoon Fork Bacon

iPhone Photography 2015 Award Winners


Tags iphone, iphone photography, iphone tips, photography tips, photo tips, photo newlsetter, photography, saulsky, syracuse, travel, VSCO cam, VSCO, iphone camera, photography tutorial
Comment

1000 Words - 2

James Saulsky March 10, 2015

This photo is one of the first I took in Portugal and is by no means the best composed, or even the most interesting image from that trip. The reason I like this photo so much is because of the story behind it and the many things you can't see in this small frame. 

At the time I took this, I hadn't slept in over 24 hours, my hair was badly disheveled, and underneath my jacket I was still wearing a day old tank top -that was probably soaked with sweat - from the night before. Alicia and I had been in Portugal for less than 10 minutes but we already loved it. It was the start of a week long spring break during our semester abroad (pretty much a vacation within a vacation) and we felt like rock stars walking down the stairs of the plane to disembark onto the sun baked tarmac...but we nearly never made it there.

The night before, we had gone to see Kaskade and The Bingo Players perform at the legendary Ministry of Sound in London. A Kaskade concert had played a big part in the start of our relationship and going to this show meant a lot to us. So, naturally, we postponed buying the tickets until we actually arrived at the venue, at which point we were confronted with a line that wrapped down the street and disappeared around the corner of the next block. Rather than wait in that mess, we opted to pick up tickets of one of the many scalpers operating near by. 

Almost as soon as we handed over our £20 each, we were approached by a uniformed man with a walkie talkie who looked like he very much wanted to confiscate our illegally purchased tickets. Instead, he looked at them, said we were good to go, and sent us on our way, which left us feeling hugely relieved. 

Once inside the club, we grabbed some drinks, explored the different rooms, and listened to the openers until the Bingo Players came on...which happened around 2am. A few of the reasons Ministry of Sound is such a famous club are that it has a fantastic sound system and a tremendous amount of amazing shows come through there, with artists who like to play very late into the night on that great sound system. As a result, Kaskade wasn't scheduled to come on until 4AM (which is also ironically the name of one of his songs), and that complicates things when you have a flight at 6:30AM . 

We stayed right until we absolutely couldn't wait any longer, hoping to catch at least the first song of Kaskade's set, but at 4:05 AM he was no where to be seen so we grabbed a taxi and went to quickly grab our bags from Alicia's flat before taking the same taxi to catch a bus that would take us to the airport. Here's where things started to get tricky. 

Upon arriving at Alicia's place we began fumbling around for her keys, only to find that we didn't have them. So we were now locked out and desperately needed someone to buzz us in at a time when most reasonable people are fast asleep. So, we did what any reasonable person who would do in this situation and repeatedly buzzed her apartment. After about 10 minutes of that, we started buzzing all the other ones until some very confused lady finally let us in. Another 10 minutes later, and a lot of loud knocking on her door, one of her flat mates let us in and we bolted down the stairs with our bags. 

Our very irritated cab driver then proceeded to take the most roundabout route possible to the bus stop. We'd pre-paid a fixed rate for the cab so there was no real sense in what he was doing but 2 missed turns, 3 one way streets, and a lot of back seat directions courtesy of Siri finally got us to the bus stop, just in time to miss the bus. 

By the time we'd figured out the bus schedule, our cab had left and we were committed to waiting for the next bus and hoping that it would get us to the airport in time to make our flight. After half an hour of anxious pacing in the pre-dawn quiet, the next bus pulled up to the stop and the driver kindly informed us that we didn't have enough cash on us to purchase the two tickets we needed.

At this point, we weren't taking no for an answer. So I ran across the 3 lane road, hopped the divider, sprinted over 3 more lanes, and booked it up the street to a faintly glowing ATM where I was able to withdraw enough money to pay for the tickets. Alicia was a very good sport throughout this whole thing considering that after all the hassles we still might miss the flight. 

I don't really remember much of what happened between getting on the bus and getting onto the plane but we somehow managed to make our original flight. And that is how we ended up on the tarmac of Lisbon Portela Airport with the sun rising behind us and huge smiles on our faces. We were so happy to be where we were in that moment and this picture very vividly brings me back to that feeling. 

When we got inside the terminal, Alicia got a gelato for breakfast and I snapped a very funny picture of her eating it. Two years later, it's still one of my favorite pictures. Lisbon is amongst the most wonderful cities that we've been to together and I deeply hope we are able to return someday, only this time we can skip some of the travel obstacles. 

In 1000 Words Tags lisbon, portugal, travel, photography, alicia, travel story, 1000 words, funny
1 Comment

jsaulsky.photo@gmail.com  |  (908) 721 - 6282